Brooklyn Sewcial
  • Home
  • Classes
    • Kids After School
    • Adult Classes
    • Private Lessons
    • CAMP
  • Birthday Parties
    • Kids Parties
    • Adult Parties
  • Blog
  • Contact
  • Meet the Teachers
  • Products

Sew Bags by Hilarie Wakefield Dayton

12/11/2019

0 Comments

 
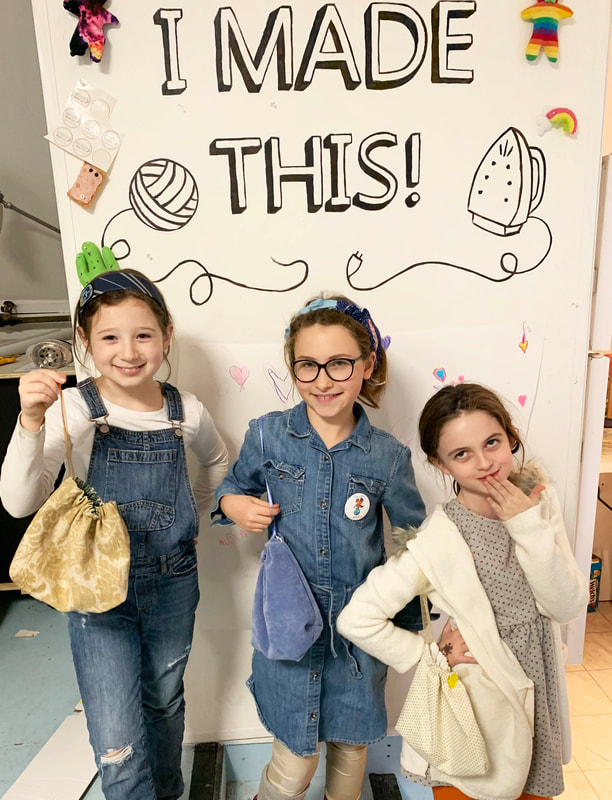
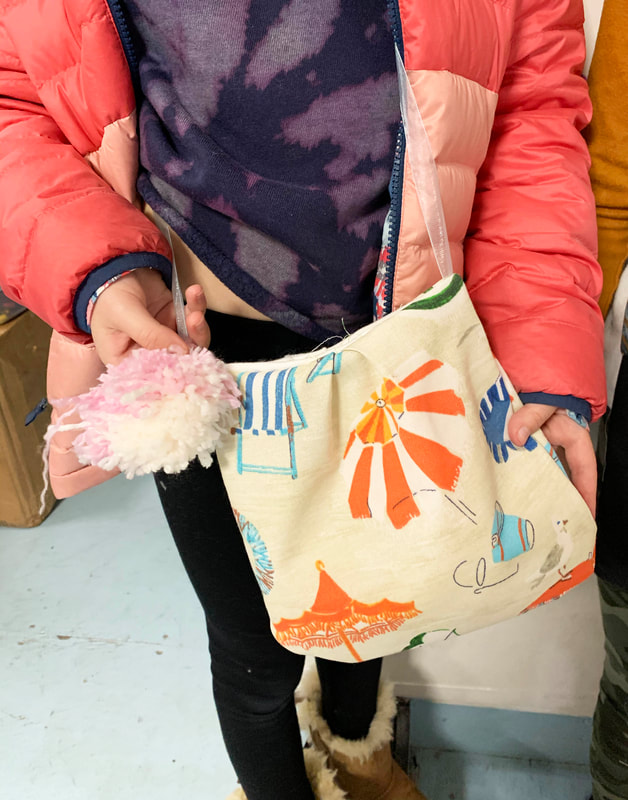
I have been following Hilarie on Instagram, @littlestitchstudio, for a few years now and always admired the bags, clutches and totes she made. So when I found out she wrote a book called Sew Bags you can imagine how thrilled I was! Not only does this book have 13 cute and unique bags, but Hilarie also give insight on how to think like a designer, and some really cut embellishments. 
Picture
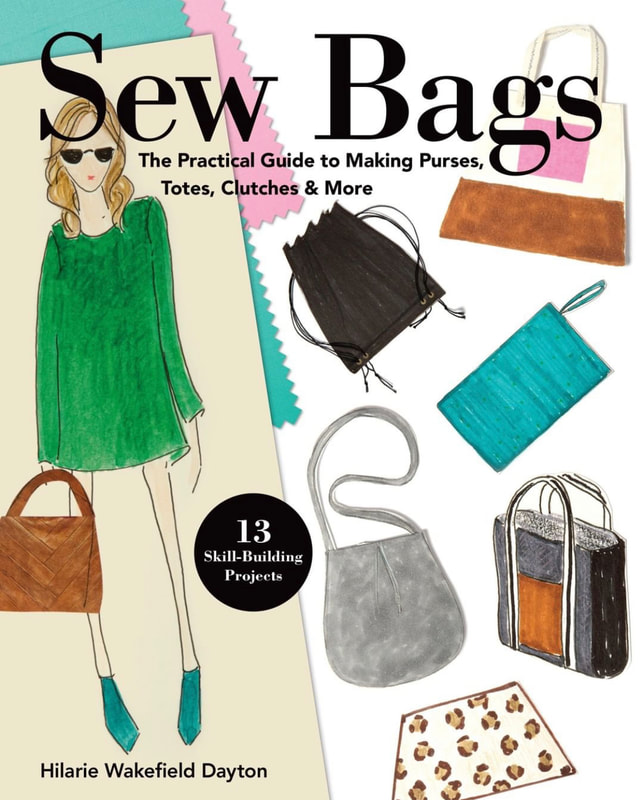
I had two classes look through the book and decide as a group which bag they wanted to make. With so many fun bags to choose from, the kids had a tough time. In the end the first class chose the Savannah Cross Body Bag, and the second class chose the Rachel Drawstring Pouch. 
Picture
Picture
I made a few adjustments to the Savannah to make it easier for my students to finish within two weeks, their standard attention span for a project. We made the strap from ribbon instead of a double folded strap from matching fabric. We also removed the D-rings, and facing. Creating a fully lined cross body that looks almost identical to the original. We were able to finish them in just two classes (total of 3 hours). 
Picture
Picture
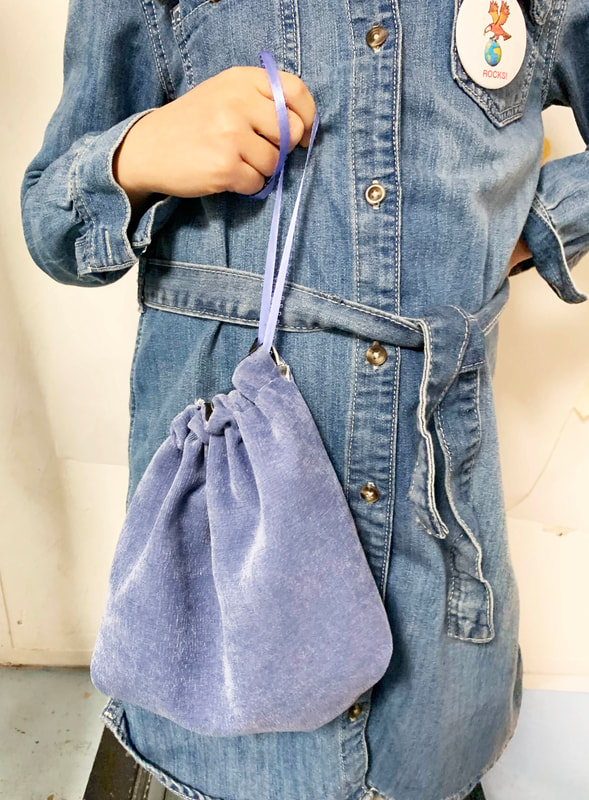
There was no need to modify anything for the Rachel Drawstring. The kids loved this one as a gift just in time for the holidays. Some said they might even use theirs as reusable gift wrap!  I just love the cute shape of this drawstring. Again this project took us two classes (3 hours) to complete. 
Picture
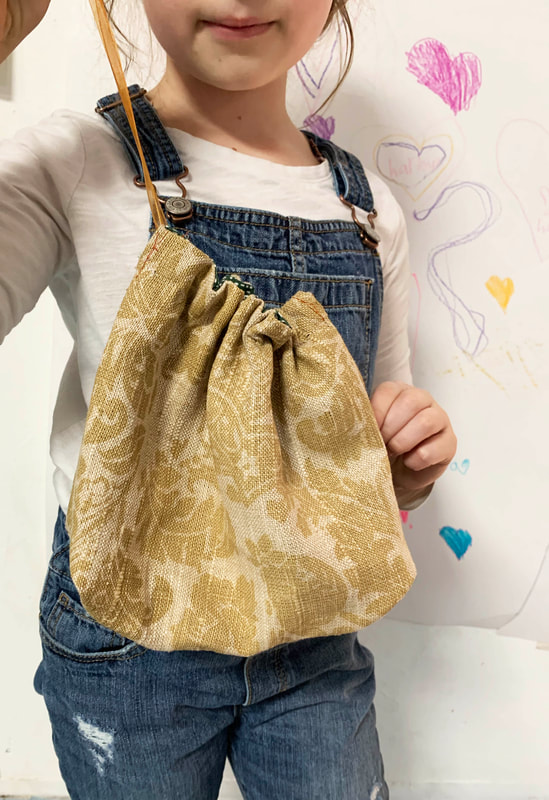
If you are looking for a gift for a Sewcialist in your group I highly recommend Sew Bags. This is great from novice - experienced sewcialists. If you have sewn before, but have never made a bag this will be great, and if you have made multiple bags and are looking to improve your skills this is also great! I have been teaching sewing for 10 years and still learned new techniques when working through the projects. 
Buy Sew Bags Here
0 Comments

Brooklyn Sewcial Passport Pouch

10/3/2017

2 Comments

 
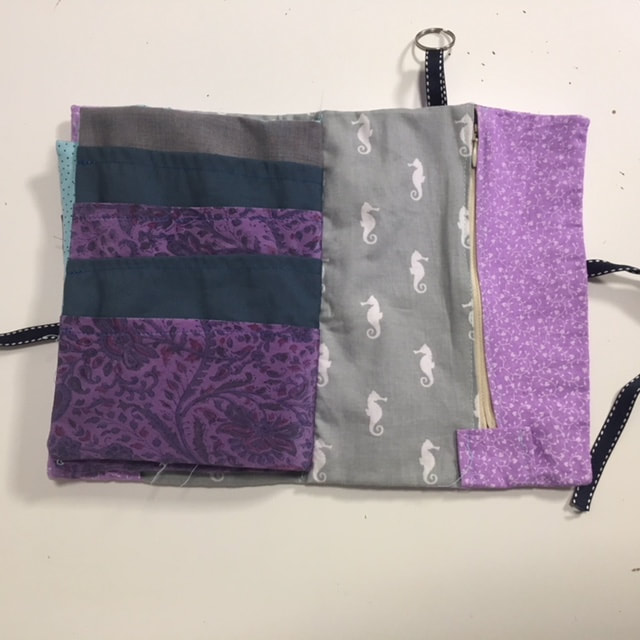
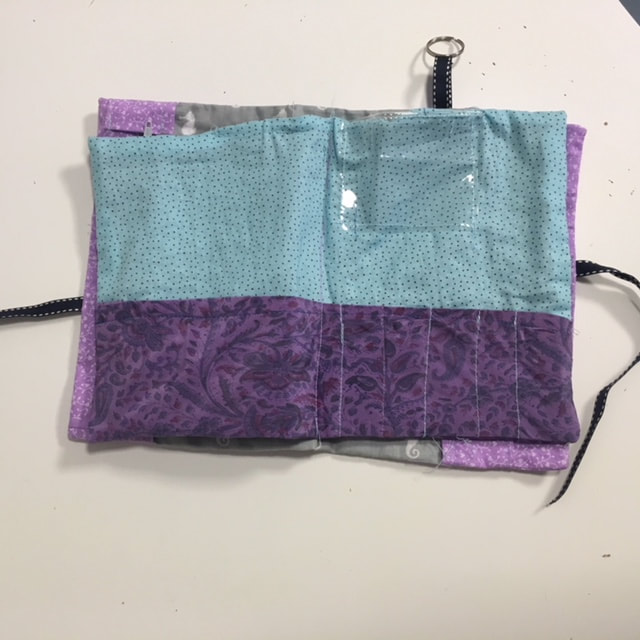
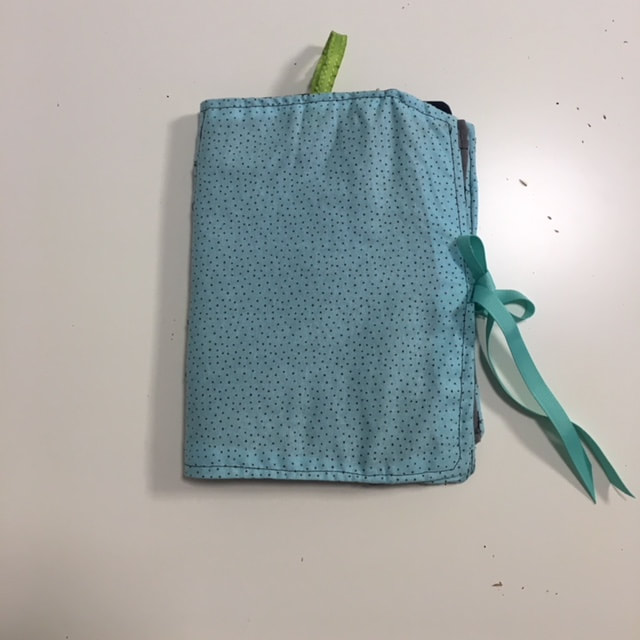
 Many of our students have family in other countries, and go back each summer to visit them. Inspired by their travel, this summer we dedicated a whole week of summer camp to travel gear. Ciara helped me create a travel pouch with lots of pockets for kids to hide their candy, passports, foreign currencies, post cards and pens. 
Picture
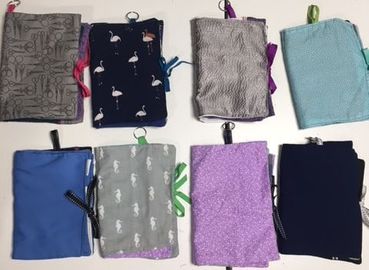
What you need:
1-6 choices of fabric (I used scraps of fabric for this)
2 8" zippers
24" of ribbon
1 keyring
Paper to make patterns (newspaper works well)

Start by cutting pattern pieces * CUT one pattern piece of each, When I mention how many to cut below I am talking about the fabric. Each piece below can be cut out of just a few fabrics or each piece can be different. I limited my students to 4 fabrics.
9"x13" - cut 1 * Outside fabric
2.5"x9" - Cut 2 *Zipper Side Panel
9"9.5" - Cut 1  *Zipper inside panel
8.5"x12.5" - Cut 2  *Inside layer, background pieces
4.75x12.5" - Cut 4 *Pockets
5.5x12.5" - Cut 1 *Inside pocket
* 1/2" seam allowances are included

If your fabric is thinner, cut interfacing for all your pieces and iron on before starting. 
Picture
1. Attach your zipper to opposite ends of the 9x9.5" piece. *the zippers are attached to the sides that measure 9" long. 
In this photo you can see our students zipper was shorter then the fabric and she added a fabric extension. .

2. Next attach your 2.25"x9" strips to the other side of the zipper. 

3. Tack both 11" ribbon to the right side of the outer fabric. One on each side at the middle of the 9". These should be facing inwards so when turn right side out they then turn outwards. 
 
4. Put these two finished pieces right sides together. Sew, leaving a 2" hole. Flip right side out and top stitch.
5. Let's make the pockets. Iron the top long side of each pocket down and stitch. (4 pieces, 4.75x12.5") 

6. Attach each pocket at the bottom one at a time to an inner layer (12.5x8.5"); Starting from the top pocket. There is no need to sew sides and center just yet. If you want to create other smaller pockets you can do so as you go. 

Picture
Picture
7. For the inside pencil/postcard sleeve start by ironing down one long side of the 5.5x12.5" strip. Sew this.

8. Attach this pocket to the inner fabric piece (8.5x12.5") by lining up the bottom edges. With a ruler and chalk mark and sew 1" lines on the right half. This will be for pens + pencils.

9. If you would like a clear vinyl pocket like ours you can attach that now.
10. With right sides together sew the two inside layers with pockets together, leaving a 2" hole. Turn right side out through the opening, Top stitch around the whole piece.

11. Placing the outside layer with zipper side up, lay the inside layer with post card/pencil case side up. Center the two pieces, mark your center line, and stitch together. 

If you would like to add a keyring you can add a 2" loop to the top of the outer layer. This is best done when attaching the other ribbon for the tie in Step 3.
Picture
Let me know if you need photos of the process to make this more clear. 
2 Comments

Peplum Refashion

5/12/2017

0 Comments

 
Picture


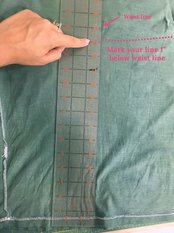
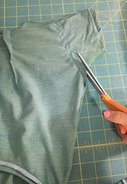
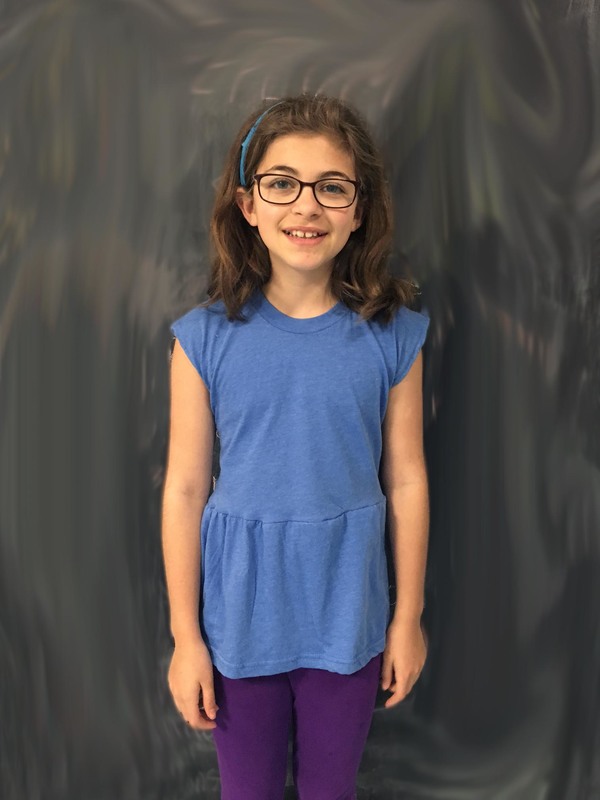
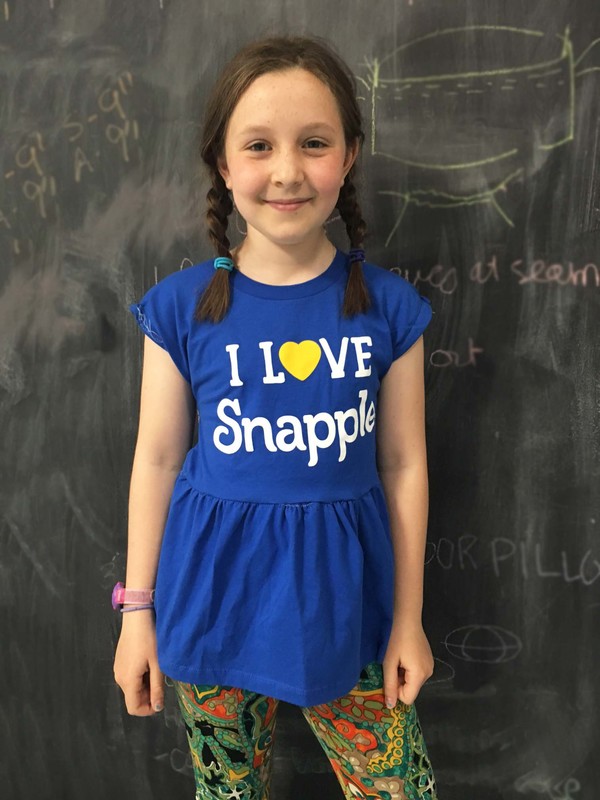
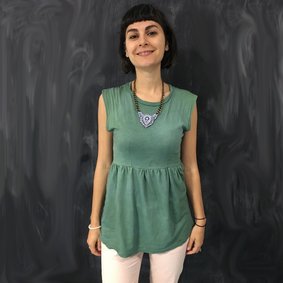
​It's Spring Time and therefore... Spring Cleaning time! This is my favorite time because not only do things get re-organized and start looking tidy again, but I also get to raid my boyfriends give away pile! 
Like all of us, he buys so many things and never wears them. Which is great because I get to take them apart and make them into something new.

Picture
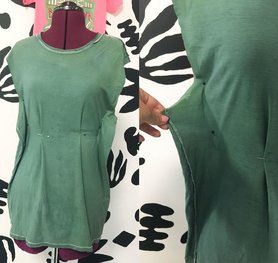
This time we're talking peplum tops from old T-Shirts. I had done this project years ago when working for someone else, but it was time to do it again with my intermediate class. 
We started by cutting off the sleeves at the seamline, turning the shirt inside out, and trying it on. You can have someone pin along the sideseam so it fits from underarm to waistline. Mark this tailors chalk. Also mark 1" below waistline.

Measure from bottom of the shirt to the 1" below waistline mark. Use this as a guide to cut off bottom of shirt (leaving it in one piece for later). Stitch up the side seams for a better fit. Try on and adjust fit. 
Run two rows of basting stitches along the top of the bottom piece.  Mark the quarter points of both the bottom edge of the top piece and the top edges of the bottom piece.
Picture
Picture
Picture
Match the quarter points of top to bottom, making sure they are right sides together. Gather the basting stitches so the top and bottom pieces are even. Stitch together.
Finish the sleeves
as desired. Some students had enough room to make a cap sleeve. The rest, made it sleeveless.
My students used shirts that had been very gently used, but I had a super dirty white shirt. I put it in a dye bath and turned it green! Get creative, get sewing.. and don't forget to tag us so we can see your amazing work!   

Picture
Picture
0 Comments

Dance Dice! The Most Fun Game EVER

4/20/2017

0 Comments

 
Picture
Picture
Picture
Picture
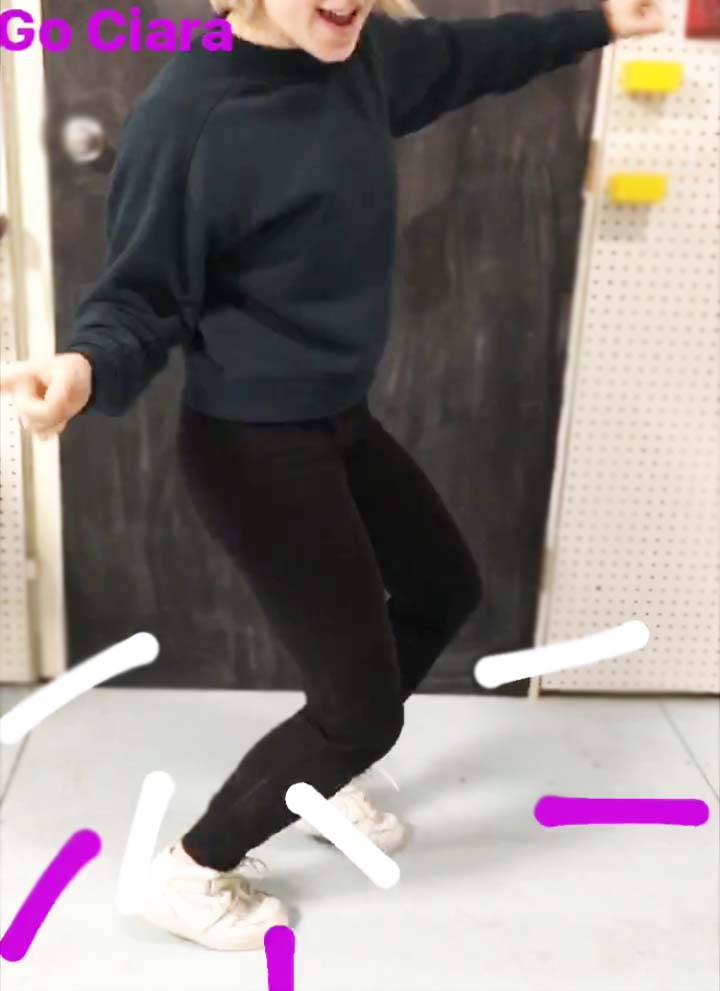
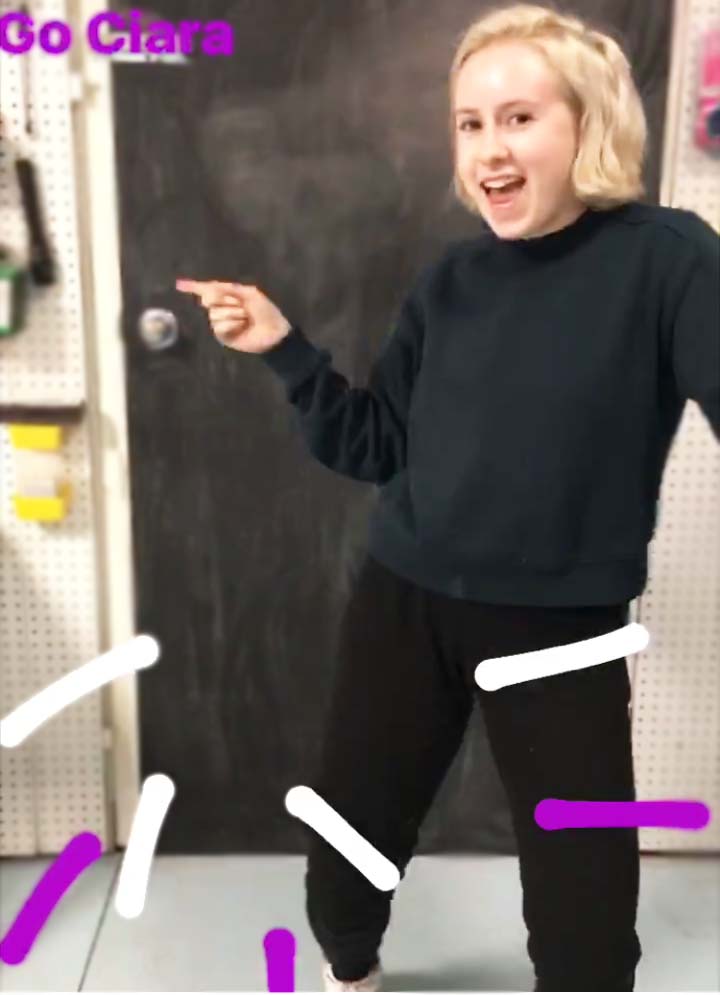
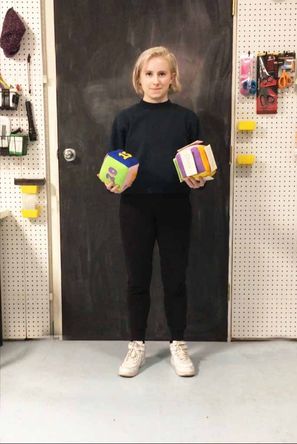
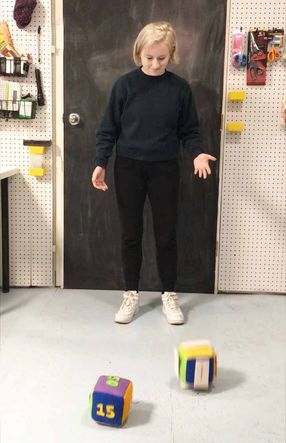
In our recent Brainstorm Session for the 2017 Summer Camps, my assistant came up with a game we're calling Dance Dice. The name might not be that exciting but the game is SO FUN!  
What is it?
The short version: 2 dice. The first with 6 different sets of numbers (15, 20, 25, 30, 45, and 50 seconds), and the second with 6 different dances...
You roll both dice, and dance the move and time they tell you.
Picture
Picture
How to make them (sorry we were so excited we didn't take photos):
What you need:
6 colors of felt
Thread
Velcro (Optional)
Fabric Markers
Scissors
Plain cotton or muslin
stuffing

Step 1: Cut two 5"x5" pieces of each color felt
Step 2: Cut the number sets you will sew on out of different colors of felt  (15, 20, 25, 30, 45, and 50), stitch the numbers to the felt. Use one of each color felt, and make sure to use contrasting colors for the numbers. (You can glue them on instead)
Step 3: 2 options here.. Cut 6 1" pieces of velcro, and stitch one loop (the soft side) piece to each of the remaining pieces of felt.  
Or you can stitch a plain piece of cotton fabric and write the dance moves directly on the cube. 
Step 4: Now sew your cubes together, leaving a hole to turn right side out.
Step 5: Stuff the cubes. We used leftover scraps from other projects because I am trying to minimize my waste. When you do this, it helps to cut the scraps a bit smaller to make sure it's not lumpy.  Stitch up the hole. 
Picture
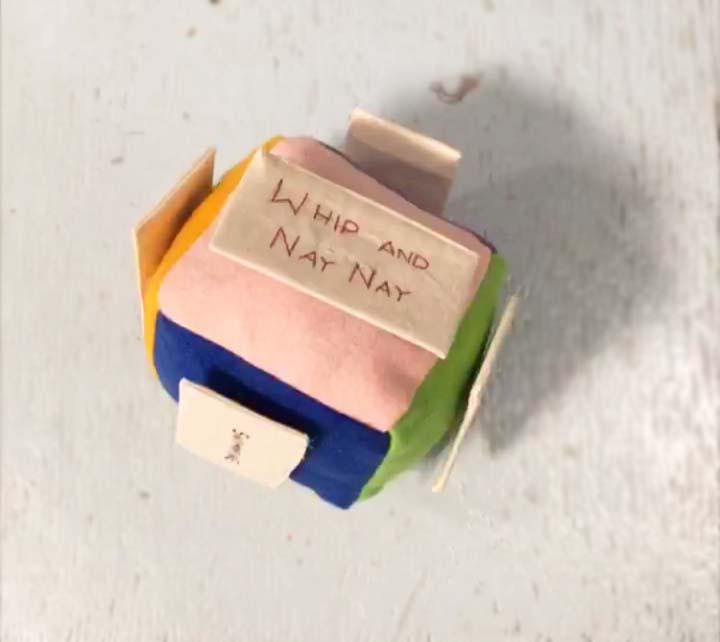
Step 6: We made our dance moves removable so we can use the dice for other activities, but you can write your moves directly on the dice. 
For the removable moves: you need 12 pieces of muslin cut 4"x2", and 6 pieces of cardboard 3 3/8" x 1 3/8". 
Stitch the hook side of velro to the center of 6 pieces of muslin. Sew together 3 sides of a piece of muslin with velcro, to a piece without velcro (right sides together- velcro on inside).  Now flip right side out, slide in your cardboard, and close up the hole. 
Picture
Picture
You can make this with any dance moves but our top picks were:
-The Running Man (pictured above- can be done the old school or new way!)
-Disco
-The Twist
-Swimming
-Whip and Nae Nae (We misspelled it on the Dice!!)
-Freestyle

Other contenders were:
- The shopping cart
- The mashed potato
- The Dab
- Macarena
- Electric Slide
- The Sprinkler
Picture
Picture
Sign Up to Summer Camp
Watch the Game in Action
0 Comments

Sew House 7 - Bridgetown Backless Dress

4/17/2017

0 Comments

 
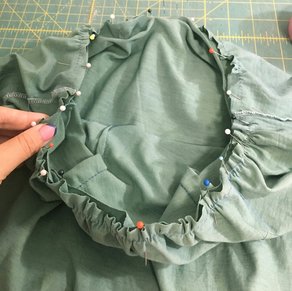
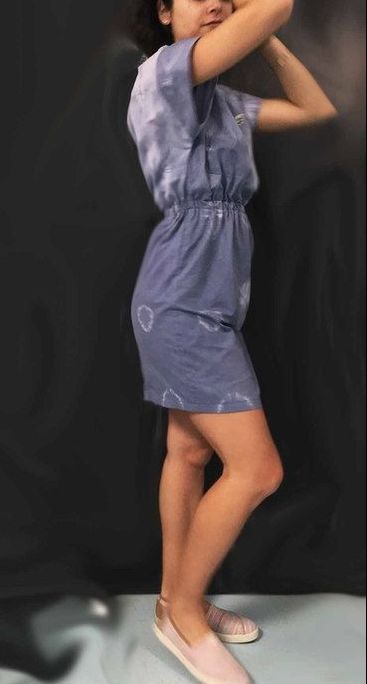
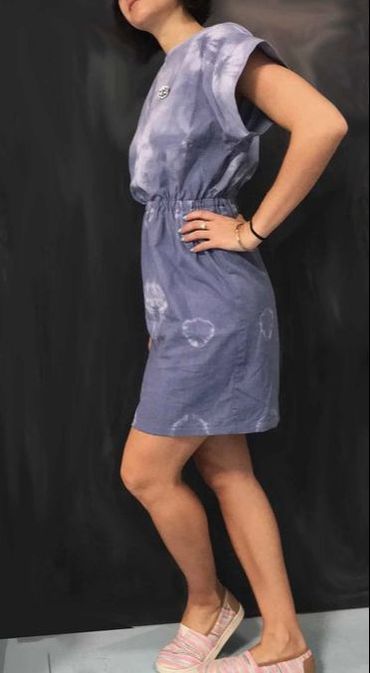
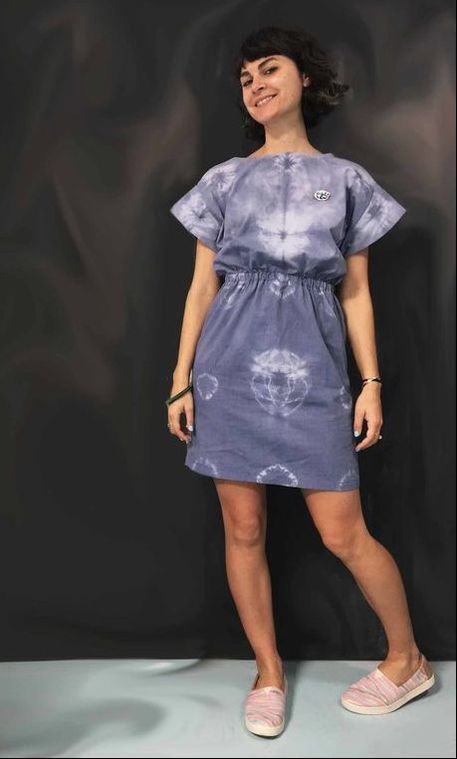
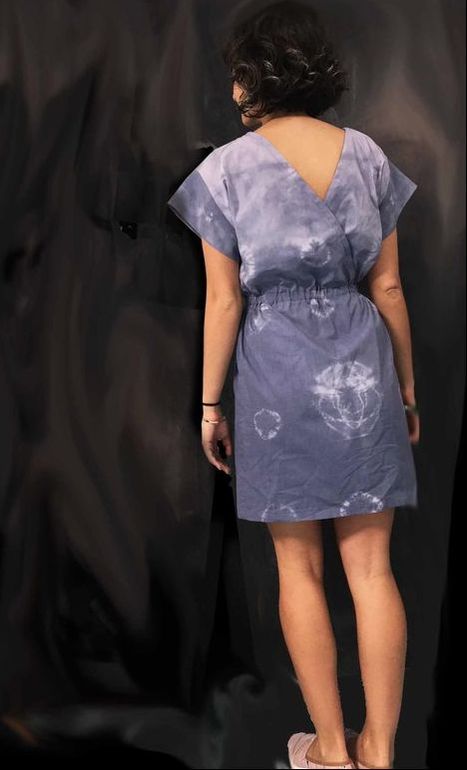
As you may already know, I am participating in the 2017- Sew My Style Challenge. This challenge is to bring awareness to the Slow Fashion movement, and to showcase to new sewists that sewing your own wardrobe is possible.  The projects listed for 2017 are: 
January- Sew House 7 Toaster Sweater 2
​
February - Named Clothing Saunio Cardigan
March- Megan Nielsen Virginia Leggings
April- Sew House 7 Bridgetown Dress
May- Califaye Collection Pocket Skirt
June- Megan Nielsen Briar Tee and Sweater
July- Cali Faye Collection Valley Blouse
August- Megan Nielsen Darling Ranges Dress
September- Named Clothing Yona Wrap Coat
October- Cali Faye Hampshire Trouser
November- By Hand London Anna Dress
December- Named Clothing AW17 New Collection (TBC)
Picture
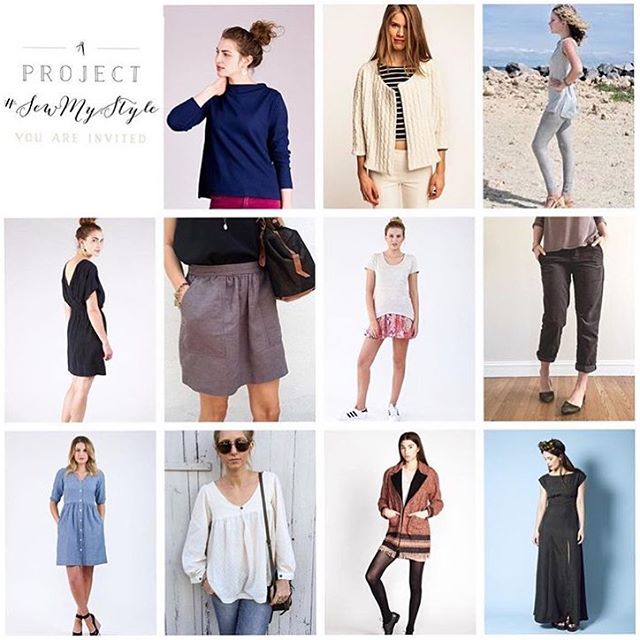
The Bridgetown Backless was such a quick sew and has several different length variations, that I will definitely be making more then one!
I wanted a dress that I had dyed for the summer so I started with a plain white cotton. I tried to find something that had a good drape, but my options were limited since I needed something that would take the dye. This dress works best with a fabric that will drape nicely like a rayon challis, silk charmeuse, rayon jersey or cotton jersey. I would love to make it again in a sand washed silk.  

I started prepping my fabric by binding it in a shibori style, and putting it in a piping hot Navy Blue Rit Dye bath. I soaked it for 30 minute, let it dry overnight, and washed it out in a washing machine. The colors came out a little dull- I think had I prewashed the fabric and put it into the dye bath wet, it may have taken the dye better. However, I did end up loving the faded look of the fabric.
Picture
Picture
When sewing the dress my chest and hips were two different sizes. I copied the pattern for size 6 skirt, and size 2 bodice. To have them match up evenly, I curved the top 4" of the skirt from size 6 to 2. 
Picture
Picture
I find that this fabric doesn't have the best drape for this dress. The sleeves stick up a bit and the back doesn't drape as I've seen in other photos. For this version I will remove the sleeves, then remake it in a sand washed silk.
I will also lower the neck a half inch in the front, and add side pockets. 
0 Comments

Up-cyle: Dyeing 

4/13/2017

1 Comment

 
Recently my boyfriend started wearing his nice t-shirts to work out, and they were getting super grubby. I was tempted to throw them away and buy new ones, but I'm trying not to add to the 10.5 Mil tons of clothing that is dumped into landfills each year. This is where my crafting nature came into play.
Picture
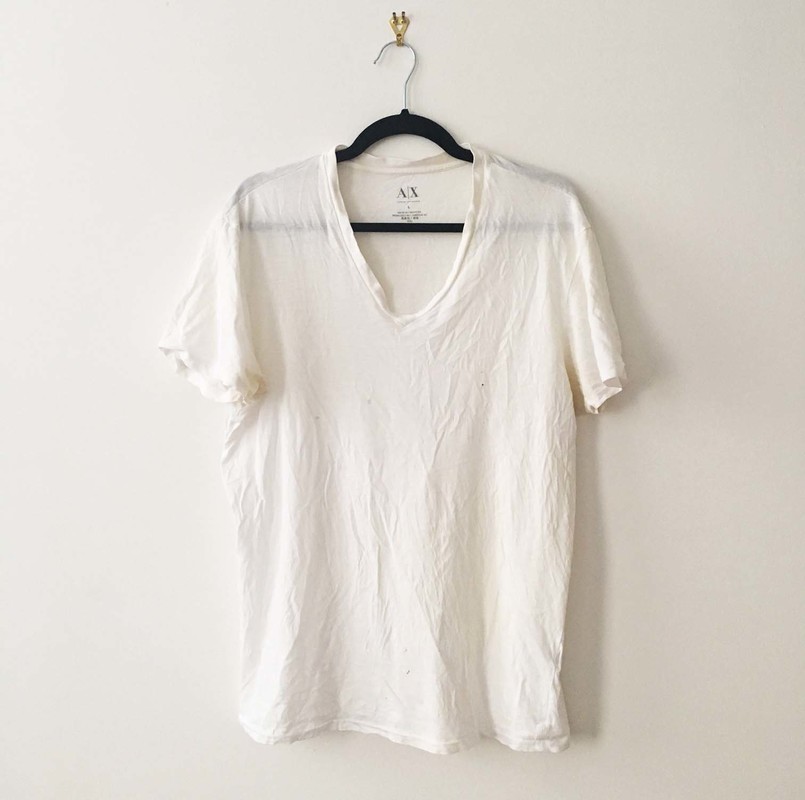
I asked if I could tie-dye his shirts with some other fabric I was prepping and I received a hard NO for a response. He has a very simple and elegant style, and was definitely not going to be into wearing a tie-dyed shirt. So naturally while he was away, I grabbed a shirt and stuck it in the dye bath. 
Picture
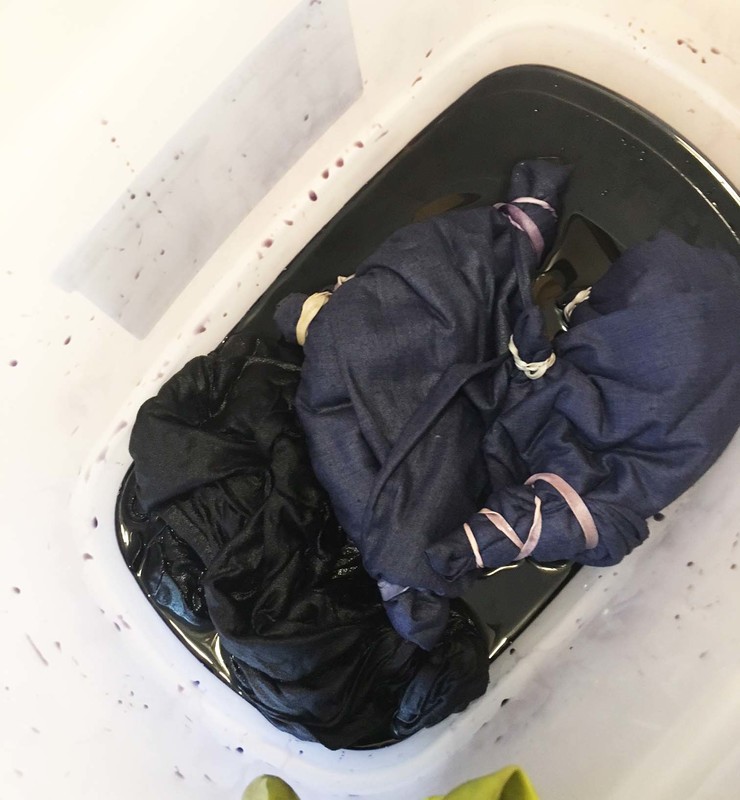
I used Rit-Dye Liquid, Navy Blue; I picked a color I knew he would like. I used about half a bottle and filled up my mop bucket about 1/3 of the way, and added 1/4 cup of salt to help the dye take. I also made sure the water was boiling hot as I started.
Pro Tip: Others have done the dye bath in a pot, keeping the water at a simmer. The hotter the water, the better the dye will take.  After about 30 min I took the shirt out, and hung it to dry outside. (I hang things outside so I don't get droplets of dye water on my beautiful floors. 
Picture
I finished by washing the shirt in a cold water cycle. In the end, I turned a very skeptical, unwilling boyfriend into a believer! He now has a new favorite shirt that gets worn all the time.  
Picture
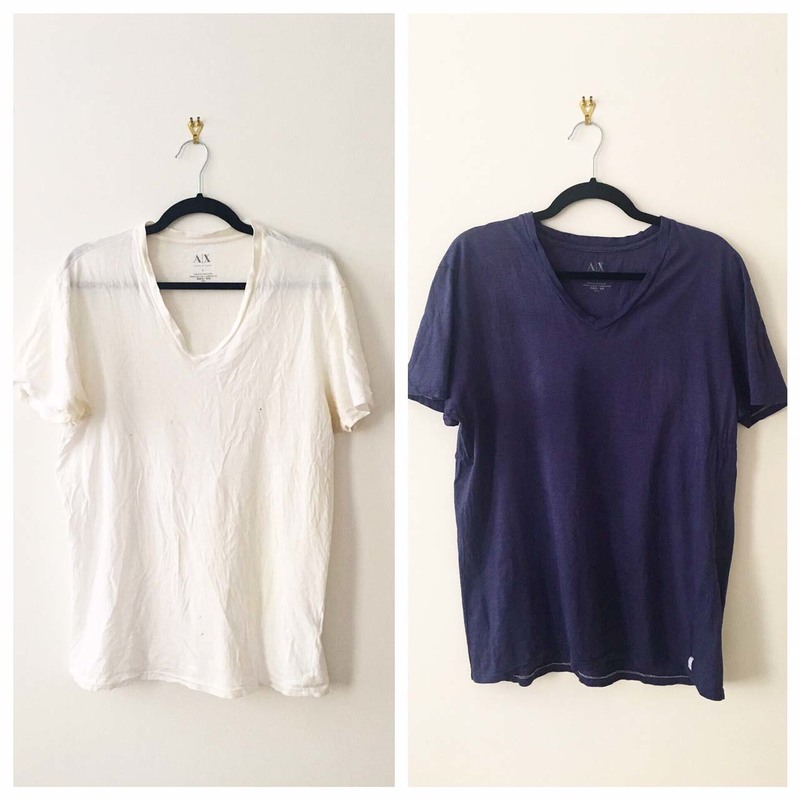
Stay tuned to see what I make with the other fabrics sharing this dye-bath! 
1 Comment

Learn How to Sew

6/9/2016

1 Comment

 
 Parts of the Machine: Pedal (Foot Controller), Presser Foot, Handwheel, Backstitch, Thread Cutter
 Threading the Bobbin:

  1. Pull spool-pin up as far as possible, then put thread on pin.
  2. Pass thread around pretension disk twice. (all machines wrap around this slightly different, check your manual.)
  3. Pass the end of the thread through the hole on the bobbin from the inside of the bobbin.
  4. Put the bobbin onto the bobbin winder shaft and slide the bobbin winder shaft to the right. Turn the bobbin clockwise, by hand, until the spring on the shaft slides into the groove on the bobbin.
  5. Holding the thread up, gently press the pedal to wind the thread around the bobbin a few times then stop. Trim the excess thread above the bobbin. (If you do not trim this thread, it may get caught while sewing and interfere with operations.)
  6. Continue to wind bobbin by pressing the pedal until the bobbin is full.
  7. When full, cut thread, slide bobbin shaft to the left and remove bobbin.
  8. Thread your bobbin following the instructions on machine.
​​
Threading the Needle:
  1. Raise the presser foot using the presser foot lever. Raise the needle using handwheel (make sure the line on handwheel is facing up), or use the needle position button.
  2. Pull spool pin up as far as possible and put thread on.
  3. Feed the thread through as shown in diagram
  4. Be sure to catch the thread in the thread take up lever from right to left.
  5. Put the thread behind the needle bar thread guy above the needle.
  6. Thread the needle from front to back and pull about 2 inches of extra thread.
  7. Draw up the lower thread  *parts of these directions have been adapted from the Brother Sewing Machine Guidebook​

Part 2: Practice Stitching Straight Lines
  1. Check your stitch length (our machines are at a width of 00) and length (3.5).
  2. Start with two rectangles of fabric.
  3. Line up about ½” from back edge and side lined up with tape.
  4. Put presser foot down.
  5. Backstitch 3-4 stitches.
  6. Sew straight lines- do not pull or push, just gently guide.
1 Comment

Quick Tip: Napkin Sewing

6/9/2016

1 Comment

 
Picture
Picture
Part 1: Make a Pattern and Cut Our Fabric
  1. Decide what size napkin you would like to make- add ¾” for each hem (1.5”/side)- draft and cut pattern.
Ex. I want my napkins at 18” I will make a pattern for 19.5”x19.5”
  1. Place pattern on top of 2 layers of fabric (this will cut 2 napkins at a time).
  2. Pins should be inside pattern (we will not cut our pins). Make sure you catch both layers of fabric.
  3. Cut around outside of paper on FABRIC ONLY.
Part 2: Sew our Napkins *If you have never sewn, Check out our Beginner Sewing Post
  1. Iron opposite sides of fabric first. Double Fold your fabric with 1/4" fold Then iron the other two sides. Fold down twice.
  2. Put fabric in machine, lining up the needle just inside the folded edge of fabric (inner fold, like how a hem is sewn).
  3. Back stitch, stitch your first line. When you get to the corner pivot- put your needle DOWN, lift your presser foot up, turn the fabric, put the presser foot down, and continue. Repeat until back at start. Backstitch at end.

For Mitered Corners:
  1. To make pattern add only ½” S/A to each side. Ex, 18” napkin is 19”x19” square.
  2. Iron all 4 sides with one ½” turn. Unfold.
  3. Right sides together, fold fabric diagonally in half. Keeping perpendicular, sew 1” from edge of point. Stop at ironed line.
  4. Cut point off at 45°. Finger-press seam open.
  5. Flip Right-Side-Out, fold ironed hem under and stitch around inside edge.


For Double Sided Napkins:
  1. To make pattern add only ½” S/A to each side. Ex, 18” napkin is 19”x19” square.
  2. Cut 1 main fabric and 1 contrast fabric for each napkin.
  3. Place Main and Contrast fabrics RIGHT-sides-together (nice sides inside), pin for sewing.
  4. Stitch napkins all around leaving a 3” gap in the center of one side (stitch all corners).
  5. Cut the excess fabric off the corners, do NOT cut stitching.
  6. Flip right side out, Iron Flat, tuck in fabric at opening, and stitch around the whole napkin.


Now Go and Practice!!
 If you have any questions about any projects please email me. 
For upcoming classes please check: BrooklynSewcial.com or http://www.meetup.com/Brooklyn-Sewcial-Beginner-Sewing-and-Sweet-Projects/

​Videos will follow

1 Comment

Quick Tip: Fabric Guide, Most Commonly Used Fabrics for Garment Sewing

3/22/2016

1 Comment

 
  • Cotton lawn: Lightweight, made using high thread count, resulting in a silky feel. Liberty of London is well known for their Tana Lawn. It gets softer and has more drape the more you wash it. 
  • Voile: Lightweight, semitransparent fabric of cotton, wool, or silk.  It has a great drape and is very similar to cotton lawn but is slightly softer. You have to love a good voile. 
  • Rayon challis: A smooth, lightweight fabric. It drapes well and is a bit heavier than cotton voile and cotton lawn. This is great for a drapey summer dress.
  • Chambray: Ever so popular!! Most do not drape as well as it's lightweight counterparts above. Chambray has a smooth hand, and is soft and easy to work with.
  • Denim: If you don't know about denim, we have other problems!! It is a heavyweight fabric with little stretch or drape. Great for pants, bags, and Canadian Tuxedos. 
  • Knit: If you are looking to make a garment with stretch, Knit fabric is your buddy. There are MANY kids of knit fabrics: interlock, french terry, sweatshirt fleece, jersey, spandex, and so much more. It is easy to get lost in the world of knit, but just think about your finished project while holding your knit options. Ask yourself: Would I really ever wear this (shirt, shorts, pants, dress) if it was made out of this fabric?
  • Silk: A delicate, lightweight, luxury-fabric.  It has a slight shine, and drapes well. It is breathable, and can be found in wonderful prints. While it is beautiful, it can be slippery and very hard to work with.  Crepe De Chine- my favorite. If you're a beginner, start with cotton.
  • Satin: Has a glossy appearance. Has a smooth finish and feels great. It can vary in weight and content. It can be made of silk, wool, cotton, rayon, and acetate.
  • Linen: Is great in warm-weather because of it's lightness, and breathability. It has little stretch and has it's very own signature look - the wrinkle.  
  • Wool: Is great for cold-weather garments, outerwear, sweaters, and socks.  You may have heard of some more common types, Merino, Alpaca, Mohair, Angora, Cashmere, and Camel Hair, but there are over 200 different varieties out there. They all feel, look and handle much differently. 
  • Flannel: Can be found in all sorts of cold weather garments: coats, pants, shirts, hats, and much more. It is a soft, warm and lightweight. You will find it is mostly made from cotton, but also wool and some synthetics. 
* Patterns are designed for Knit or Woven fabrics and will specify what types of fabrics can be used for each pattern. It is good to go by what your pattern tells you, but we don't always have to play by the rules. The one thing I wouldn't do is use a non-stretch fabric when your pattern requires a stretchy fabric. 
1 Comment

Brooklyn Summer Art Camp 2016

2/26/2016

2 Comments

 
 It's only February, but we all know what that means- Summer is approaching so fast, and we need to think about where the children will be going to camp this year. 
We live in one of the biggest cities in the world and there is no shortage of amazing camps and activities for children, but how do you decide?

At Kids at Clay and Brooklyn Sewcial we put together week long camp with very unique activities. You won't find anything like us. The mornings are filled with sewing and crafting activities that are challenging, on trend and fun. The afternoons are filled with hand building, painting, glazing and lots of fantastic clay projects. Sewing and Pottery classes are for both boys and girls.
Picture
We are happy to announce we have been featured in this years Summer Camp Guide by Brooklyn Bridge Parents, listing the top 30 camps in Brooklyn Heights, DUMBO and other parts of Brooklyn. 
Picture
Picture
Space is LIMITED so please contact me right away to RSVP : BrooklynSewcial@gmail.com

What you need to know:
Where: 135 Plymouth St, Studio 607
When: Sign up by the week from June 27-Sept 2
Full Day: 9:30-4:30 (Students must pack lunch)
Sewing: 9:30-12:30
Pottery: 1:30-4:30
Price: Full Day $600, Half Day $310
Deposit: $100/child/week - Checks can be made out to Noble Tile & Vessel or Brooklyn Sewcial, Chase QuickPay is also accepted.

​You must complete this Registration Form, and email to BrooklynSewcial@gmail.com or mail to
Brooklyn Sewcial
135 Plymouth St.
Studio 607
Brooklyn, NY 11201

Please include check for deposit to hold your child's place. 

We are looking forward to meeting a bunch of new friends for 2016 Camp!!! 
XO
2 Comments
<<Previous

    Brooklyn Sewcial

    Bringing ideas, tips, and tutorials about sewing, DIY and modern crafting. 

    Archives

    December 2019
    October 2017
    May 2017
    April 2017
    June 2016
    March 2016
    February 2016
    January 2016
    October 2015
    August 2015
    July 2015

    Categories

    All

    RSS Feed

      Join Our Newsletter!!

    Subscribe to Newsletter

Location

Contact Us

What Our sewcialists Are Saying

"I can't believe I made all of this after only one week of sewing camp! And I've never even used a sewing machine before! I'm so sad that it is over😢 I really hope i can go again! It was my favorite camp ever!!!!!!" 
Ruby... 12 years old

"I was extremely impressed by Brooklyn Sewcial's adult sewing class. I arrived not knowing a thing about patterns or sewing machines and left with a fully functional (and super cute to boot!) tote bag made by yours truly. I was walked through following a pattern, cutting, pinning and sewing with easy to follow instructions. 

Alexa is a patient teacher and the atmosphere is fun and very laid back. All levels of experience should go check it out! Your future favorite tote (or headband, leggings, etc.) could be waiting for you to create it :)."
Lauren U. ... Adult Class

Subscribe to our mailing list

* indicates required
  • Home
  • Classes
    • Kids After School
    • Adult Classes
    • Private Lessons
    • CAMP
  • Birthday Parties
    • Kids Parties
    • Adult Parties
  • Blog
  • Contact
  • Meet the Teachers
  • Products